Monday, December 12, 2016

Have a Holly Jolly Myxie! :D

Today I'm going to tell you about my 4th annual Christmas Myxie(mystic pixie) Ornament, I just do one of these pieces a year but I really enjoy working on them.
In this Blog I will walk you though my process of my latest Christmas Myxie Ornament, Holly berry. 

I usually start off by forming a wire frame, sort of like a skeleton for a sculpture. Then I start sculpting the torso from the shoulders to the knees around the wire. As soon as I have it the way I want, I bake that part. I have to know what position I want my piece in ahead of time because once I bake that section, I can't change it. 
Then I sculpt the legs from the knee down, feet and arms to the elbow, these are then added to the baked torso. 

 I usually sculpt the head and face next. After that is baked, I attached the head to the wire frame. The last part to be sculpted is the neck, forearms and hands.
Here's a fun collage I put together to show my hand sculpting process.
 My Myxies have 4 fingers on each hand. :)
Now my piece is completely sculpted, time to paint the details to my Holly Myxie. 
 And paint her shoes and add her under garments

Lets give this little one some clothes.
 I hand sew each tiny garment. Hand crafting her sweet little gloves and stockings, making a perfect addition to her outfit. Ribbon trim and jingle bells add a nice touch to her skirt. 
After making her a nice top to match her bottom, I give this bald little darling some hair. 
I had initially planned to make this Myxie a blond but she decided she wanted to be a redhead. I can't argue with a Myxie that knows what she wants :)  
Now she is ready for her holly wings, I specially handcraft them for her. ALL DONE! The 4th annual Christmas Myxie ornament is complete and looking festive.


 This beautiful piece sold right away, these pieces never go very long before finding a nice new home, but don't worry, I make one each year. Just follow my Facebook page and Instagram to get updates and progress photos as I make new pieces.
Check out my Etsy store for my available sculptures.

Thanks for reading! And Happy Holidays!
~Caralyn


Monday, November 7, 2016

COLORING PAR-TAH!!! :D

Heads up, I will be at Christmas in Lithia, Lithia Springs GA High School Craft show this weekend. I will not have my little sculptures with me, (they are still resting up from the DCon excitement LOL) But I will have my prints, The Adventure's of Mend children's book and my COLORING BOOK HennaDreamers available at my booth. I will be sharing the booth with my sister, her lovely patchwork items will be there. Some beautiful handcrafted purses, bags, holiday gifts and quilts for purchase. I will also have my husband's books with me, Winston and Baum SteampunkAdventure series. So make sure you come by to see us. :)
And that is not all.
My husband will be at C1 ComiCon in Ringgold GA on Saturday from 10am-5pm, He will have his books available along with some of my prints, children's books and my Coloring Book.
Not done yet :D...I am super busy this weekend :P
I am having a book release/coloring party at Rev Coffee in Smyrna GA from 6-8pm on Saturday. Come by and get your Coloring Book (if supplies last I will have some)and then stay to drink coffee and color for a fun a relaxing evening.
Will keep you posted this week about these events on my social media sites.

Plenty of fun things to do and lots of places to find my work this weekend, OH BOY! :D

Thanks for reading!
~Caralyn

Friday, November 4, 2016

COLORING BOOK IS HERE!!!

I have been working on something for the past few weeks and I am finally finished, so I can now tell you all about it and I hope you will be as excited as I am. :)
I have recently gotten inspired by the art of Henna(the body staining/temporary tattoo artform). I found it very soothing to sit and doodle the designs after a long day. Before I knew it, I had several illustrations finished and thought, These would be fun to color. So guess what I did, I MADE A COLORING BOOK YAY!!! The book is filled with fun Henna designs and lovely ladies to help relieve stress as you add color to each page.
The coloring book is currently at the printers and I'm hoping to have it available on my Etsy store and at any shows I am attending by the 2nd weekend of November. My next show will be at Lithia Springs Christmas Craftshow in GA Nov. 12th and 13th so come on by and get your copy. Can't wait that long? You don't have to, you can get my coloring book on Amazon.com right now! It has just become available today OH BOY!
 Cover Photo

 Back Cover
Here's a look at the kind of designs you will find in my Coloring Book.  

I am so very happy with how this project came out and I hope it will be relaxing and a fun way for the mature colorists to express themselves.
Thanks for reading everyone! Happy Coloring! :)
~Caralyn 

Thursday, November 3, 2016

Pretty as a Peacock

So it has taken me a little while to recover after the hectic craziness that is Dragon Con, but I have finally got back to sculpting. I had a few requests for commission pieces at the beginning of October that I had to work on but with those done one of the first new pieces on my list was a Steampunk Peacock. Oooooooo :)
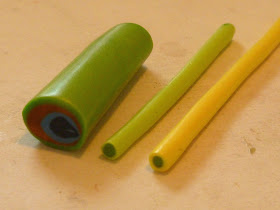
As always I start with the general shape of the bird, hand sculpting it out of polymer clay. Then I made some polymer clay canes for the feathers. A cane is comprised of two or more colors that you stretch and press together to make a rod that can then be cut to make several polymer clay "stickers" if you will, to be added to your sculpture.
The large tail feathers were canes that I press together and then stretched out to make a teardrop shape. 


After my canes were finished I flushed out more details on the face and body of my peacock.
I made some legs and feet for my sculpture and then started to add the small cane feathers. I placed each of them one at a time, smoothing the tip after it was placed. The end result was a fun array of black/white and green/yellow feathers covering my peacocks back.

Metal jewelry pieces were then carefully cut to the desired shape and added to the piece. Thus the Steampunk Peacock was finished and ready to brighten up anyone's home. :)


I hope you enjoyed and learned alot from my blog. This beautiful piece is available on my Etsy store, but there is only one so make sure to check it out. :)
Thanks for reading!
~Caralyn 

Tuesday, September 6, 2016

Dragon Con is Over...Time to sleep


Was such a great Dragon Con! Had so much fun seeing all my Con buddies and getting to meet all new people. I won two awards for my pieces EEEEEPPP, so now I won't have to go through the jury process to get in to Dragon Con next year, SO EXCITED! :D


Almost all of my little guys found new homes, I will be posting the few remaining sculptures to my Etsy store this week.

Thank you all so much for coming by to see me and my little friends. Everyone was so nice and positive and just made the 4 days so awesome!
BIG WELCOME to all the new Mystic Reflection followers! :D
And super special Thanks to my dear friends and family who I would never be able to survive this huge busy show without their help.
Looking forward to next year. :)

Thank you for reading!
~Caralyn

Wednesday, August 31, 2016

The Steampunk Pals take Dragon Con!

Last day to get things in order before we leave to set up at Dragon Con. I am packing everything up today, all my little creations will be wrapped and put in tubs for the ride to the Hyatt Regency Hotel, which will be their home for 4 days. They are super excited.

I will be in the Art Show September 2nd through the 5th. I have a Gallery, Auction Table and a Booth where I will have prints and sculptures available. My booth is on the back wall where I usually am, the 8th table from the right but you can just look for the Mystic Reflections Banner. I will have new prints available at my booth along with my Steampunk animal pals, Gryphons, Dragon Pals and their Steampunk Dragon cousins.


Also this year I am going to try something different and I hope fun...Mystery Boxes! Each Box will contain a retired Myxie or Fantasy sculpture, these mystery boxes will be $50 each ($100 value sculptures) I only have 5 available. Exciting to see which piece you might get.

I hope to see you all there, Lets get this Con started! :D
Thanks for reading
~Caralyn


Monday, August 22, 2016

How to Make your Dragon

I have had a soft spot for Dragons since I was a little girl. Then I grow up and still can't get enough of them, it's obvious from my collection of little hand-sculpted polymer clay cuties. I have been sculpting Myxie Dragon Pals for several years now :)

But I thought it would be neat to make a big one. So first I started with the general shape I wanted. This Dragon was going to be framed so I was just sculpting the head and neck. 
After pressing in his glass eyes I sculpted the details on the face. With a sharp clay tool I etch each scale into the soft polymer clay. His teeth were sculpted using transparent polymer clay so his toothy grin would look more realistic. 
Not sure what the fleshy part hanging off the neck is called but I've seen reptiles with one so I assume Dragons have one too... so I sculpt one on my Dragon and add more horns down the back of his head :)
After adding his chest plates, a plate at a time, I then add his scales, placing each one by one. Making sure not to forget to add the scales in the frame background to give the appearance that he is coming out of the frame. The process took a while. 
Once each scale was in it's place I was able to attach his large horns. And then he was ready to be baked. Usually with my larger pieces I bake them in sections but I was able to heat this guy all at once.
 Now to paint on the details and my Dragon is ready to hang on anyone's wall. I painted in all the cracks and corners with dark blue paint and then wiped the excess off to make the end result a lovely light blue.


This Dragon was such an awesome experience. I was able to stretch my creative muscle and try out techniques that I haven't been able to try on my smaller pieces. This piece took me over 30 hours and approximately 7 ounces of polymer clay to complete. He stands around 8 inches tall and is probably my favorite of my sculptures right now. :)
This dragon will be displayed in my Gallery at the Dragon Con Art show in September for those of you that would like to see him in person. 
I hope you all enjoyed my Step by Step process. 
Thanks for reading!
~Caralyn