Working on my second framed Dragon. My first Dragon was "Kuu" the Moon Dragon. Had so much fun creating him, I thought I would do another one for the Dragon Con Art Show this year. But I couldn't just do the same type of Dragon, I wanted something new and challenging. How about a Forest/Tree Dragon, it was certainly challenging enough for me.
I started by sculpting a general shape out of polymer clay. This sculpture will be framed so I only need to make the head, neck and shoulders. I wanted the piece to look more like the Dragon was poking his head through a window and not like a mounted head.
Glass bead eyes are placed into the head and details are sculpted into the clay. The sculpture is starting to look more like a dragon now. Using a pointed tool and a rubber tipped tool, I give my dragon a mouth where I can place his small teeth and then sculpt some nostrils.
I know I want this dragon's body to be covered in leaf like scales so I begin with the background, where I want his body to appear to be coming from. I make some polymer clay canes (a rod of polymer clay consisting of two or more colors that form an image). I cut pieces from the canes and form each piece into a leaf shape.
Next I make a clay back on my frame and then start laying the leaves one at a time. This is a time consuming process that will cover my entire sculpture.
The dragon is attached to the frame back with craft wire and liquid Sculpey, a useful materiel for any sculptor. It works like glue you can bake.
I didn't want my forest dragon to just be green leaves, he needed a bit of contrast. So I started working on little roots that would go in and out along his neck and eventually sprout out the top of the dragons head like a tree top.
After the roots were all sculpted, I began incorporating each one into the leaves and along his neck. I even added a few to his throat and under his chin.
The roots in place, I started on the chest scale leaves of my piece. I made these leaves a bit lighter in color and much larger.
Before I got too far, I took a moment to start adding the branches to my dragon's head.
I wanted his crown of branches to look a specific way, so I took my time placing each one and rearranging them to get the right look.
Once the head pieces were where I wanted, I resumed adding the leaf scales until I had the neck completely covered.
Time to work on the face of my sculpture. The cheek and mouth scales needed to be much smaller than any I had done previously so not to overwhelm the facial features.
My Forest Dragon just needed some paint on himself and his frame to make him complete.
Here he stands in all his glory..or hangs on your wall in all his glory.
I hope you enjoyed this step by step blog, this piece will be available at the Dragon Con Art Show in September. :)
Thanks for reading.
~Caralyn
Monday, July 24, 2017
Wednesday, July 12, 2017
Don't Fawn over Her too much
I like to make several framed sculptures for my Galley in the Dragon Con Art Show. I enjoy them because it is a 3D piece you can hang on your wall. This year I am working on a sweet Fawn. Slightly different than a satyr or pan (a creature that is half goat) a fawn has attributes more similar to a deer.
Well let's get started on our Polymer Clay Sculpture.
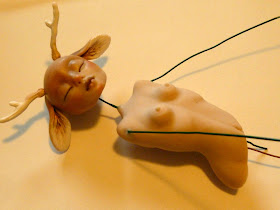
Began with the head on this piece. I took my time to get the look just right to reflect the attitude I was trying to achieve in this sculpture. I was going for a peaceful look. And I wanted my fawn to be holding/playing a pipe so I puckered her lips slightly.
After I was happy with the head and face I worked on her ears. Since I wanted this piece to resemble a deer, I sculpted her some sweet animal ears.
Normally I wait until last to sculpt any extensions or accessories but for this one I went ahead and made her some antlers and her pan pipes.
Now to sculpt her torso. The display frame for my fawn is around 3.5x3.5 so I only needed to make half a body, stopping just above the hips.
I added the neck, upper arms and shoulders next.
Then the hands are sculpted and added to the arms, making sure to angle them so they can hold her pipes.
This small collage walks you through my hand making process.
With the main piece done, I get started on the background and frame. I like to use small wood frames and remove the glass and back part. Then I make a new back out of polymer clay. This makes it easier to attach my sculpture to the frame. Flowers and leaves are sculpted inside the frame right onto the background.
I make a few other flowers to go in our fawn's hair.
The little fawn is attached to the background, using craft wire and liquid Sculpey, and then baked.
Details are usually painted on after the baking but with this one I did a bit of detailing before hand. It works well either way.
She is now baked and ready for her hair do.
For the hair I take white doll hair and separate it into thin sections. Each section is tipped with a spot of glue, I like to use hot glue so it dries faster. Each bit of hair is then placed carefully on the fawn's head until she has a lovely updo.
Our girl is all finished now and looking enchanting as she plays her pan pipes.
I hope you enjoyed this step by step process. Check out my social media sites for more of my art.
Thanks for reading!
~Caralyn
Well let's get started on our Polymer Clay Sculpture.
Began with the head on this piece. I took my time to get the look just right to reflect the attitude I was trying to achieve in this sculpture. I was going for a peaceful look. And I wanted my fawn to be holding/playing a pipe so I puckered her lips slightly.
After I was happy with the head and face I worked on her ears. Since I wanted this piece to resemble a deer, I sculpted her some sweet animal ears.
 |
| Pretty cute don't ya think? |
I added the neck, upper arms and shoulders next.
Then the hands are sculpted and added to the arms, making sure to angle them so they can hold her pipes.
 |
| This collage is for a three fingered Myxie. |
I make a few other flowers to go in our fawn's hair.
The little fawn is attached to the background, using craft wire and liquid Sculpey, and then baked.
Details are usually painted on after the baking but with this one I did a bit of detailing before hand. It works well either way.
She is now baked and ready for her hair do.
For the hair I take white doll hair and separate it into thin sections. Each section is tipped with a spot of glue, I like to use hot glue so it dries faster. Each bit of hair is then placed carefully on the fawn's head until she has a lovely updo.
Our girl is all finished now and looking enchanting as she plays her pan pipes.
I hope you enjoyed this step by step process. Check out my social media sites for more of my art.
Thanks for reading!
~Caralyn


