Thursday, January 18, 2018

Three inch tall Pets Anyone?

As an Artist that makes one of a kind animal sculptures, one question comes up often... "Can you make a sculpture of my pet?" Well the answer is, Yes I can...probably :P
I have made tiny copies of customer's beloved fur babies for a few years now. Each little fuzzy family member has their own personality and I try to convey that in each piece.
I start by getting several photos of your sweet pet for reference. I begin with the face of the animal, because that is usually the most difficult and most important part.


Once the body is sculpted I can add wings, steampunk or any other fun accessories to the piece to make it unique to the customer.


I have also had unique poses requested to help the sculpture convey the pets personality even more.
 And don't think this fun keep sake can only work for dogs, I have made cats too. :)
This sculpture was made to hold a forget-me-not necklace. 

A lovely gift for someone looking for a different way to commemorate a pet or just for a sweet tiny copy of a furry companion. 
Want to request a custom commission sculpture? Just send me a message on Etsy or you can email at mysticreflections@gmail.com and I can give you a quote. 
Thanks for reading!
~Caralyn 

Monday, January 8, 2018

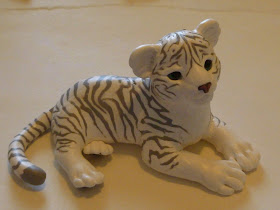
Giving a Tiger His Stripes

There are two ways I know of to add color to your sculpture. You either paint your sculpture or you use colored clay. I like to use colored clay on my pieces, I just like the look of it better than when paint is used. So I try to paint as little as possible on my pieces. It sometimes adds more time to finishing a sculpture but it also adds quality in my opinion.
So now I am going to walk you through one of my sculptures, using colored polymer clay to add stripes to a White Tiger.
I start by sculpting the body using white clay. I add colored glass beads for eyes and pink and black clay for a tiny nose. Then I mix black, white and a small amount of blue clay together to make a soft gray. I roll the gray clay out into long snakes/rods, trying to get the clay as thin as possible.
The next step is to lay the lengths of clay rods on the Tiger's body. Once you get the pattern the way you want, start flattening out and pressing the clay until it is smooth. 


This part is very time consuming but worth the end result. :)
Keep lining up the rods in the pattern, pressing and smoothing each line out. Make sure to be mindful of the flow of the back so you don't end up with wonky stripes...Yes, wonky is bad. :)
All his stripes are added, he is looking like a fine white tiger and he isn't even baked yet.

 After the sculpture is baked I then add small painted details to give depth and highlights to my sculpture.


The end result is a unique polymer clay piece. By using less paint, the color on this sculpture can not be scratched off or fade.

This little guy has sold but visit my Etsy store for my available pieces.
Check out my Step-by-Step blogs to see other times I used this technique. 
Thanks for reading!
~Caralyn