Come enjoy my world of Fantasy and Steampunk creations.

Mystic Reflections' Creations

Mystic Reflections' Creations

Caralyn's Events and Appearances

  • Aug. 30th - Sep. 3rd - DragonCon: Atlanta GA
  • Feb. 23rd-24th 2018 - ConNooga, Chattanooga TN
  • Nov. 17th-19th 2017 - Atlanta Steampunk Exposition: Atlanta GA
  • Nov. 11th - 12th 2017 - Christmas at Lithia Springs High school, Lithia Springs GA
  • Oct. 7th 2017 - RevFest: Rev Coffee Smyrna GA

My Blogs

Let's see what I have been up to. :)

Sunday, July 24, 2016

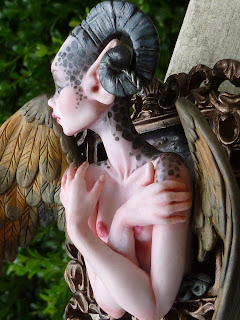
Step by Step Framed Harpy Sculpture

I really enjoy working on my Framed Sculptures. I just love the thought of a picture that is 3D hanging on the wall. I wanted to keep this piece very simple, keeping the Harpy the main focal point of the piece by not adding alot of frills to her.
I started with the head, definitely my favorite part to sculpt.

After I get the head and face the way I want, I move on to the body. I usually sculpt the body in sections or layers, baking the piece between each layer. The arms and hands are normally the last part to be added.


Now to make her wings.I went with a gold and brown color.

Secure her in the frame and add her wings and horns. 


Now she ready to have details painted on. 


And she is all done and ready to be featured in my Gallery in the Dragon Con Art Show in September.

Keep checking my blog for updates on what pieces I will be bringing to the show.
Thanks for reading!
~Caralyn

Thursday, June 23, 2016

Riding a Steampunk Carousel

    I have always loved carousels ever since I was little and didn't have people yelling at me to get off and let the children have a turn...Who says adults can't go to carousels and ride while screaming that they are a princess...Annnywhoo
So I made my own carousel horse and due to my love of all things steampunky, I put a fun little twist to the traditional carousel ride. :)
It's all about dat base so that's what I started with, take several small wood circles, glue them together and drill a hole through the center. ( I got my husband to help with that part because I can't be trusted with power-tools.:P ) Then paint your base, I used white and gold.

 Now for the main part. Sculpt a rough shape of your horse; I usually sculpt the body and limbs separate. After you finish the details on the face you then attach the limbs to the body with wire.


Then you can sculpt any more details to the piece. I usually sculpt pieces that stand freely but this sculpture was a little more challenging because I had to sculpt each part while it had a large wire through the center of it. Made it very difficult to put down, and figuring out how to bake my horse was another chore entirely.
Time to add the steampunky accessories! Using clay and metal jewelry and watch pieces I bring my steampunk carousel horse to life.
All Done! Despite the size of this sculpture, he almost looks like he could carry children around and around until they got sick. FUN!!! :D


I am super happy with how this piece came out, I would love to make a few more steampunk carousel animals but I am not sure if I will be able to with the up coming Dragon Con Art Show I will be attending in September.
Keep checking out my Blog and FaceBook page to see what all I will be working on as the show approaches. :)

Thanks for reading.
~Caralyn


Friday, June 10, 2016

Check out this Crocodile Smile

Spent a few days in Florida last month and it got me in the mood to make an Alligator Steampunk Myxie Pal.
I usually start with sculpting the head on my animal pals and just form a rough shape of the animal's body.
 Then you can start to add the details and smooth out the torso shape.
Then comes the limbs, I sculpt each individually and attach it using craft wire frames. 
Once the body is finished, details such as scales and teeth can be added to the piece. 

Gears, Craft wire and metal jewelry pieces are added to give the animal a Steampunky feel. Then the piece is baked and the remaining details are painted on. And your Steampunk Alligator is done. :)


That's one good lookin Gator. :)
For my available handcrafted polymer clay sculptures, check out my Etsy store

Thanks for reading,
~Caralyn

Wednesday, May 25, 2016

Steampunk Cuties

That time again when I crank out new Steampunk Dragon Pals. My last few shows/conventions cleaned out my inventory on these lovable little critters, so I've been working on some brand new little darlings. :)
Here's what I've gotten done, I may work on new Steampunk animal pals for a bit but don't you worry, I'm not done with the fan favorites just yet. :)
Oh and by the way, I was accepted into the Dragon Con Art Show in September again this year so I will be sure to make plenty of these little guys before then. :)
Love the metal butterfly wings on this one. 


Really fun colors on this little guy, the gold and the dark gray make such a nice contrast. 


This little one is my favorite so far....don't tell the others ;P

I have posted most of these guys on my Etsy store, check out the link for my available pieces. :)
Thanks for reading!
~Caralyn

Thursday, April 28, 2016

Whisper to a Hummingbird

I just finished a piece I have been working on for a friend. Her mother-in-law loves Hummingbirds so she wanted me to make something special for her for Mother's day.
I wanted the Hummingbird to appear like it was flying while drinking from flowers, not an easy task but I had an idea of how it would work. I started by making the flowers for the base.
Azaleas are a good pretty Flower to sculpt. 

After all the flowers were sculpted, I attached them to a wood base using glue and craft wire. Then I sculpted small polymer clay decorations to the corners of the wood base.

Just add a small message and painted details and the base is ready for the next step.

Sculpting the little Hummingbird was the most fun, I sculpted the sweet little body and wings separate and then attached them with liquid clay and craft wire.

I sculpted the little bird with a wire going through the length of his body and out the tip of his beak, to help attach him to the flowers. Then details were painted and the little guy was ready to add to the base.

ALL FINISHED! 


I really enjoyed working on this piece, and my friend was very pleased with how it turned out.

For commissions/custom orders contact me through my Etsy store.

Thanks for ready!
~Caralyn