Come enjoy my world of Fantasy and Steampunk creations.

Mystic Reflections' Creations

Mystic Reflections' Creations

Caralyn's Events and Appearances

  • Aug. 30th - Sep. 3rd - DragonCon: Atlanta GA
  • Feb. 23rd-24th 2018 - ConNooga, Chattanooga TN
  • Nov. 17th-19th 2017 - Atlanta Steampunk Exposition: Atlanta GA
  • Nov. 11th - 12th 2017 - Christmas at Lithia Springs High school, Lithia Springs GA
  • Oct. 7th 2017 - RevFest: Rev Coffee Smyrna GA

My Blogs

Let's see what I have been up to. :)
Showing posts with label Michaels. Show all posts

Tuesday, April 3, 2018

Dry Clay Problems?

Any artist that has worked with Polymer clay, or any clay for that matter, has run into the dry clay issue. It happens just so; you sit down to sculpt a nice piece, open up a fresh new brick of clay and start rolling it between your fingers. But unlike normal, this particular clay doesn't roll into a nice ball as you intended, instead it crumbles in your hands like week old toast.
Who's gonna clean this up?
This will not do at all. Now usually I will spend several hours kneading the clay until it is more pliable and I can finally make something with it; although that usually is followed by blistered palms and sore digits. But I finally met my match, a clay that was just too dry to knead at all. I LOVE Premo Sculpey brand, I pretty much only use it but this one brick was not making it easy on me.
This one here was the week old toast kind!
I have never used clay softener before so I was pretty skeptical about giving it a try but it was either that or toss this batch of clay out and open a new brick, NAY I SAY! THIS CLAY SHALL NOT BE DISCARDED!!! I may have not been quite so dramatic about it...okay I totally was. :P  
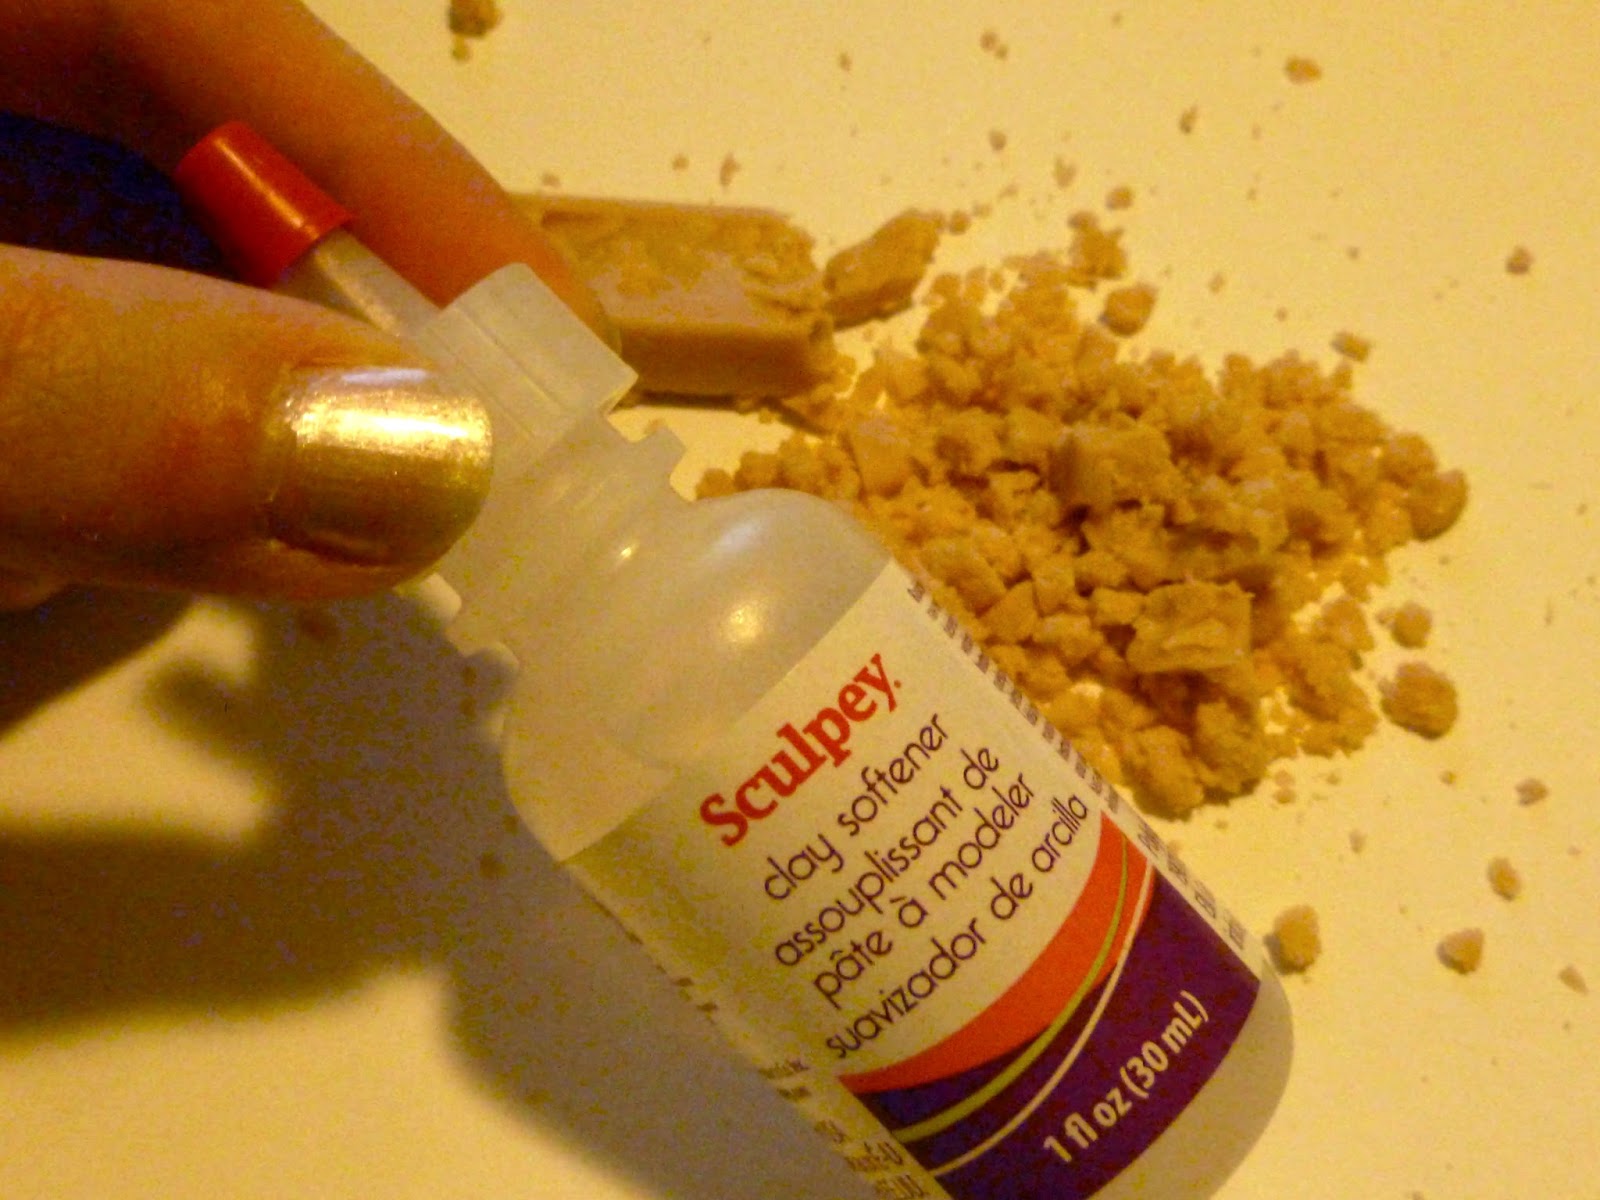
I was able to find this clay softener at Michael's Art Supply Store. Sculpey Clay softener.
Oh yeah, that's the good stuff.
I am totally hooked now, it worked like a charm. Just a few drops of this stuff, a few minutes of kneading and molding and Voila, clay just like new. It is a bit greasy at first, it needs to be to soften the clay but after just a few moments of rolling the clay in your hands and it is soaked in.
This brand worked just great for me so I have not tried any other brands but it wasn't too expensive either so I will most likely keep this little miracle worker on hand from now on.
Can't make cuties like this little guy using dray clay. :)
I just wanted to share my little find with you all, I hope this blog can help others dealing with dry clay. Don't throw it out, work it out. :)
Thanks for reading!
~Caralyn

Monday, October 26, 2015

First Time Wood Burning Experience

My husband and I just celebrated our 5th wedding anniversary this past weekend. We like to stick to the "traditional" wedding anniversary gifts and this year was wood. So off to Michael's Art Stores to pick up a little wooden box, they aren't expensive and they come in several different styles. The one I got was specifically chosen to hold my husband's Bicycle playing cards collection. Originally I was planning to just draw all over the box with a Sharpie but as I walked past the wood burning tools, I was intrigued to give it a try. They didn't have too many tools to choose from so I purchased the least expensive one, I'm sure there are much better quality burning tools but as a first time user, I wanted to make sure I would enjoy it before spending alot. So now that I had my tool and my canvas, it was time to go home and see if I was going to create art or burn the house down :D
After carefully reading the user directions and making sure I was following the safety tips, such as wearing gloves, I was ready to test out my new toy. I started with a small box I purchased just for the testing of my burning tool. 
Holding the tool takes a bit to get used to, you hold it much like you would a pencil, however you are gripping it higher on it's base so it feels slightly awkward, at least it did to me. Touching the tip to the small particle board box and the wood melted away easily leaving a nice black dot. Dragging the tool along I was able to draw, not as smoothly as you would a pencil but without too much difficulty. Before I knew it, my little testing box was covered in my scorched doodles. Now to move on to the gift box.
I was not happy with the little latch that came with the box so I first replaced that with another I was able to purchase in the wood section.
Then I sketched out the picture I would be burning; there is no eraser for the burning tool so I wanted to make sure I knew where my lines would be. 
Burning this box was slightly more difficult than the smaller box, I am not sure, but I think it was due to more knots in the board. But I was still able to fill my little particle board canvas with lots of art work with a small amount of effort. 
Make sure to always wear gloves when working with your wood burning tool, I was thankful I had gloves on when about half way through my work I smelt leather burning and realize I had rested my ring finger on the hot metal of the tool, had I not been wearing my protection that would have been a painful lesson that no one wants to learn.
After my box was covered in my burned designs I stained it. I am sure that the particle board was mostly to blame but the stain washed some of the burned lines off and I had to reburn them. If I had used oak wood or some other type of wood it may not have erased my lines but it was not that difficult to touch up my piece.


My gift was done and my husband loved it and promptly stored his card collection inside.
I loved wood burning and am definitely going to use my new tool again soon :)

Hope you all enjoyed reading about my first wood burning experience that since I didn't set my home on fire I plan to be doing again :D
Thanks!
~Caralyn 
 

Thursday, January 16, 2014

DIY SNOW GLOBES!!!

Morning Everyone!
I have been working all week putting together a Baby Shower for my dear friend. She is having a sweet baby boy and since he is gonna be a Winter Baby, the Shower is going to have a Polar Bear/Snowy Theme! HOW CUTE!!!
So I decided a Fun project would be to make a few Snow Globes to use as center pieces. It was so much fun working on these so I thought I would share the process with you :) You can also find easy D.I.Y.s on Pintrest, that is where I got my “know how” from.
I started out with a little plastic empty snow globe. I found these at Michael's, they had them on sale after the holidays, but a Manson Jar or babyfood jar will work just as good.

Then I sculpted two sweet little Polymer Clay Polar Bears to go inside. If you aren’t feeling super artisty, don’t worry, small clay or plastic figurines you buy at almost any store will work just fine. In fact they have some at Michael's :)

Then affix your figurines to the base or lid of the globe. To do this, I first sanded down the base and bottom of my figure, a rough surface makes for a better hold. Then I used super glue to attach, but epoxy or gorilla glue works too. Let the glue dry over night.

Make sure the figure sits perfectly inside the globe before the next step…

Fill your globe with water, leaving just a small amount of room at the top, then add a tbsp of glycerin and a tbsp of glitter, then put more water until it touches the tippy top...if you don’t fill it all the way you will have an air bubble at the top of your globe, I still got a little one in mine but it’s hard to get it completely bubble free. Oooo Bubbles!

If you make this in a jar, you can then add glue to the inside rim and tightly screw your lid on and DONE!

I slowly pushed my figure and base into the globe (with help from my husband, he held the base for me, four hands is way better than two when working with a bowl filled with water and glitter, didn't want that all over my floor. Would've looked like my Mermaid Myxies had a party in my kitchen :P )
I dried it completely and then added gorilla glue to the opening of the base (again my hubby helped :) ) then we screwed the lid on tightly and left it over night drying before I turned it over.
You don't have to, but if you feel like adding some color to your base, paint the lid or do like I did and add festive tape to it and Modpodge the heck out of it :)


And BAM! POLAR BEAR SNOW GLOBES!!!

Happy Crafting Everyone! Thanks for reading.
 ~Caralyn

Monday, April 4, 2011

Fun Pendants!


Hey friends! I’ve been making a few polymer clay pendants recently. I got some really cute ideas watching tutorials on youtube. You can get all kinds of ideas just by searching “polymer clay”, I spend WAY too much time doing that.

Anyway, I picked up these different size clear stones from my favorite store…MICHAELS! I’ve been using them to make some fun pendants like clocks and compasses. I’ve really been enjoying working on them, it’s simple and easy to crank them out and gives me a brake from my other sculptures. I’m hoping to have a nice amount by the time Dragon Con gets here and I’ll have them at my booth for you lovely art fans. :)


I’m working as much as I can on brand new pieces for the Art Show. I will post photos of all my progress as I go so keep checking my blog for updates.

Thanks for reading!

~Caralyn

Tuesday, March 24, 2009

I’m no Van Gogh…I have both my ears :P

Greetings Friends,

I have a few projects I’m currently working on. The majority of them are paintings. I really haven’t done too much painting before. I prefer to color my work in photoshop…because there is an erase button…nah I’ve just used that for so long I’m the most comfortable with it. But as it is harder to create “large” pieces using photoshop, I don’t have much of an option but to do them on canvas. It’s not that I dislike painting, I just haven’t had as much practice.
Since I use acrylic paint for painting the features on my Myxies, I figured it would work the same for canvas. The only problem I have with acrylics is it dries a little too quickly, making it difficult to spread the paint as far as I need. Of course it works just fine for small detailed paintings because I don’t have to wait as long to add the next color. Lord I’m so impatient! Never the less I went searching for just the right paint for me. I have heard a lot about watercolors, in fact at shows many people ask if that is what I use to color my work…nope, that’s just good ol’ photoshop.
So I went to my favorite place…Michaels and picked up some water colors. But when I tried to use them, to my dismay, they didn’t work how I expected. The paint didn’t seem to soak into the canvas like other paints. It just sort of sat on the top and beaded up…Now that won’t work at all. Perhaps it was the type of canvas I use or maybe it could have been a cheap brand of watercolors but needless to say I was not impressed.
So until I found something that works for me, it looks like I will continue using acrylic. But since I am fairly new to the whole painting thing, I always appreciate any advise anyone can give me on what I should try. Thanks Friends!

Salutations!
~Caralyn

Monday, March 9, 2009

Patience is a Virtue

Hiya!

So I went to Binders Saturday, Binders is this really great art store I like to go to. It’s sort of like Michaels only it has more “art” supplies and less crafts. That’s where I venture when I need to get a canvas or Scratch board.
While I was there I met a talented artist who was displaying some of his work there. He was also in the process of painting a large canvas. He was painting it for his son as a wedding present. The artist was copying a photo of the couple taken at their wedding. The bride was dressed in a long red sari, The vibrant color caught my eye as soon as I walked in the door. All along the edges was a beautiful white lace, the artist was working on that when I approached him. As I came closer I realized he did not have a brush in his hand but an x-acto knife. He must’ve seen the confusion on my face cause he told me what he was up to before I could even ask. He explained that he was afraid he would lose some of the detail if he just painted the lace with a brush, so instead he was chipping away the layers of oil paint to expose the canvas underneath. A tedious task no doubt but from how the painting was turning out well worth it. He then went on to say he achieved to bright red, not from mixing paint but from layering it…14 layers to be exact. He said it had already taken him over 140 hrs to get where it was and he still had a little ways to go before it was finished. Can you imagine? I don’t even have enough patience to paint my nails.
Each of his pieces had so much detail, you could tell he puts alot of time into his work. People always say, patience is a virtue well I say patience is an artist. But seeing his work inspired me, I think I may even start on a painting this week.

Later
~Caralyn