Come enjoy my world of Fantasy and Steampunk creations.

Mystic Reflections' Creations

Mystic Reflections' Creations

Caralyn's Events and Appearances

  • Aug. 30th - Sep. 3rd - DragonCon: Atlanta GA
  • Feb. 23rd-24th 2018 - ConNooga, Chattanooga TN
  • Nov. 17th-19th 2017 - Atlanta Steampunk Exposition: Atlanta GA
  • Nov. 11th - 12th 2017 - Christmas at Lithia Springs High school, Lithia Springs GA
  • Oct. 7th 2017 - RevFest: Rev Coffee Smyrna GA

My Blogs

Let's see what I have been up to. :)
Showing posts with label unique gifts. Show all posts

Monday, March 12, 2018

And then a Cutethulhu was Born...

Hello Art Fans!
Today I am going to be walking you through how I make one of my Cutethulhus. These little baby Cthulhus are a fan favorite and I have a difficult time keeping these tiny Eldergods in stock. But I do enjoy working on these little maddening dears so it is never long before I have another batch sculpted.
Anyway, let's show you all how these sweet dream thieves get created.
I usually make them all in varying shades of green polymer clay. I start with a fat clay rod.
Shaping a ball at the end of the rod gets the head started.
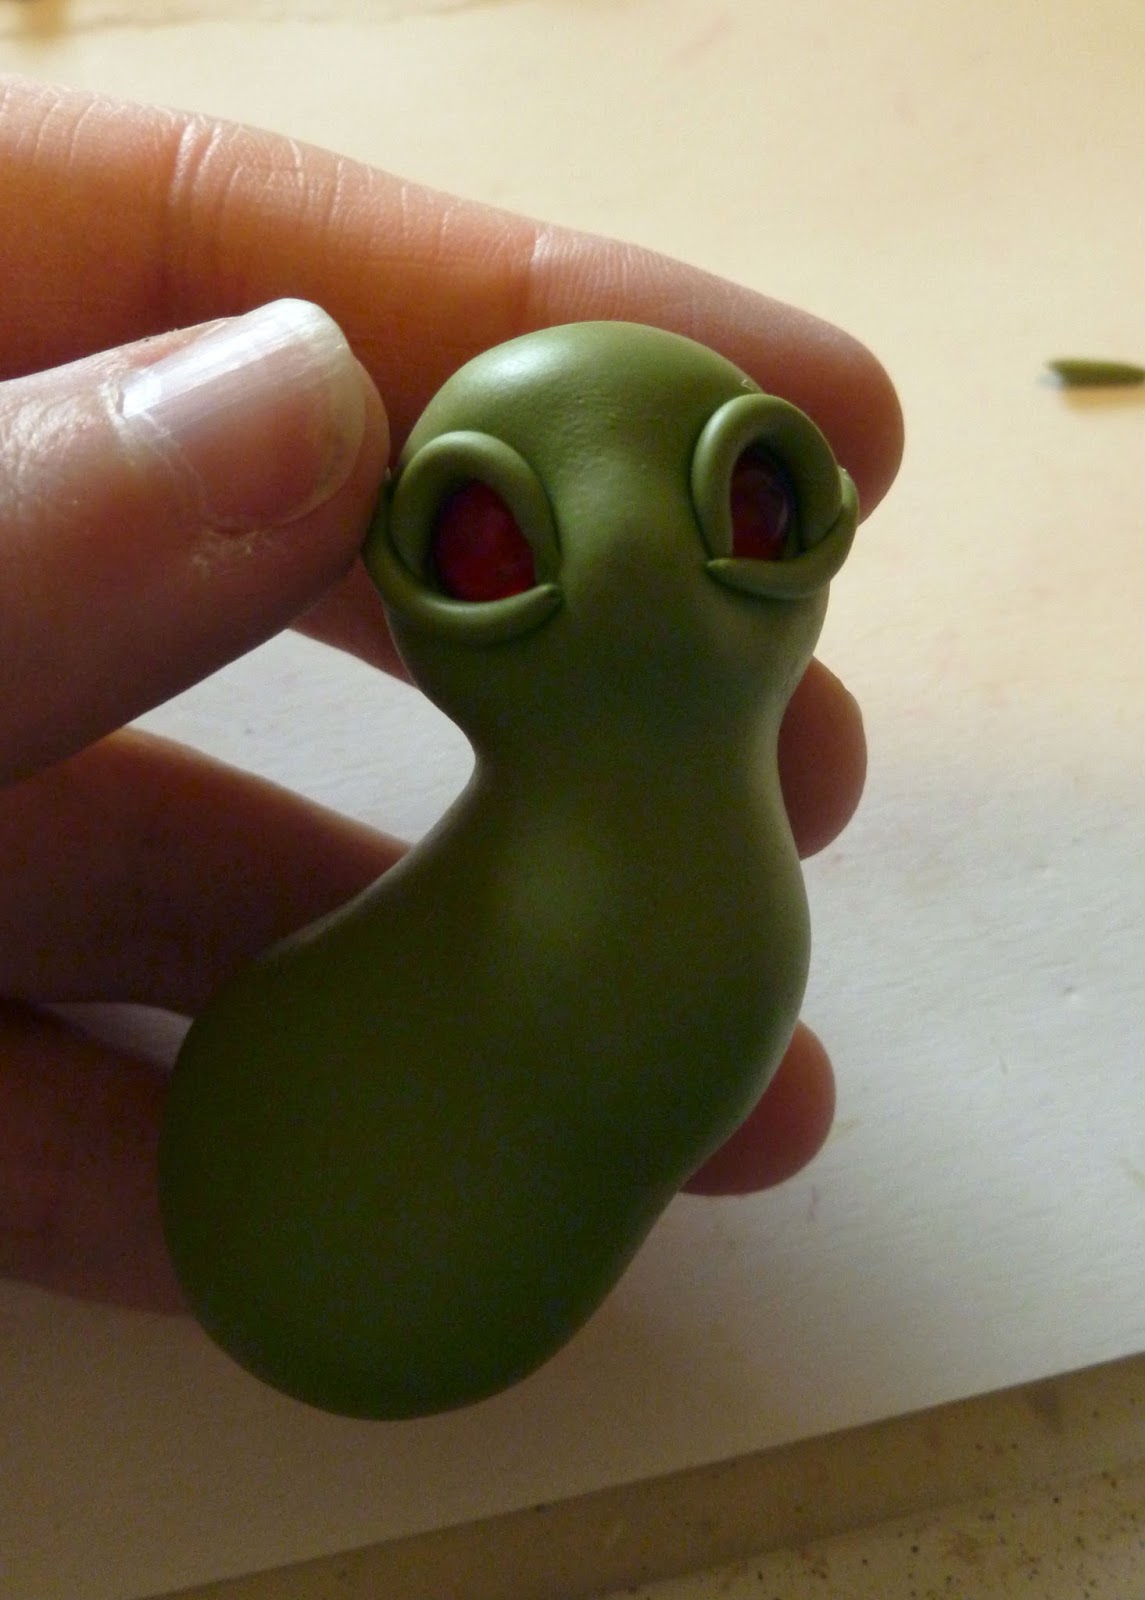
Red glass beads are inserted into the head for eyes.

Then I sculpt eye lids around each bead. Making sure to smooth out each piece of clay that is added to the main rod body.

Gotta give our guys some hips that don't lie. :P
 Smooth those hips into the body.

Now lets make some arms and feet for our little Eldergod. I start with little tear drop shapes and cut three toes into the tops of the drops. Then each toe is smoothed out and given a tiny claw on the end.
Little body parts; bones, skulls and hearts, are made a head of time and then added to the awaiting arms of the mini Thulhus.

And no Cthulhu, cute or not, is complete without their tentacles. So we roll out some thin clay rods, attach them to the tiny nose and twist them about.


The next step is tedious and time consuming but our sculpture just wouldn't be complete without it. Circular tools are used to add small scales to the polymer clay, one at a time.

Clay spines/hairs are rolled out and placed down the back of our creations.


Time for the wings. After sculpting some teeny bat like wings, they are attached to complete our Cutethulhu's look.

Once the sculpture is baked, small details are painted on and our Cutethulhu is Born.
This little Eldergod is ready to make you go mad with cuteness...Sweet Dreams! :)


Cutethulhus just wanna enslave your mind. 
Hope you enjoyed this step by step blog. I only have a few of these unique pieces in stock so make sure to check out my Etsy store for my available pieces.
For more of my work visit my FaceBook and Instagram sites.
Thanks for reading!
~Caralyn

Wednesday, March 1, 2017

Making Endora the wild Forest Myxie

This curious creature is a wild little Forest Myxie. She spends her days hiding in the trees and playing small pranks on unsuspecting travelers that might pass her way. Try to catch her if you can but her free spirit can never be tamed. 
I held a fun contest last week to find a name for this sweet little Myxie. I got such a great response and she received a fun new name Endora.
Thank you everyone that participated in our Naming Contest.
So now I bet you are wondering how she was made? You know you are. :D
Using polymer clay, I started with her head. The face is usually the most difficult part because you want to get it just right so the personality of your creation shows through. Eyes are first and then the nose and mouth.

 Next I sculpt her torso, upper arms and legs. Her hands and feet are sculpted separate and added at the mid way point during baking. Then her head is attached and her neck is added and baked.


Step by Step collage on sculpting a foot.
Step by Step Collage on sculpting a hand. 
After she is completely sculpted, details are painted on her face, body, hands and feet. 


For her wings I used skeleton leaves that I glued together and cut into the desired shape. The wings were attached to craft wire and then glitter and feathers were added. 
Now she is ready for some clothes and fun hair. For her outfit I used small strips of fabric to fashion a small shirt and skirt. Some reddish yarn/doll hair, combed out, makes for a lovely wild look. 


Endora is all finished and ready to frolic in the trees. :)
This sweet Myxie is available on my Etsy store. 

Thank you for reading, I hope you enjoyed watching Endora come to life. 
Follow my Facebook and Instagram pages for my newest pieces. 
~Caralyn 

Monday, December 12, 2016

Have a Holly Jolly Myxie! :D

Today I'm going to tell you about my 4th annual Christmas Myxie(mystic pixie) Ornament, I just do one of these pieces a year but I really enjoy working on them.
In this Blog I will walk you though my process of my latest Christmas Myxie Ornament, Holly berry. 

I usually start off by forming a wire frame, sort of like a skeleton for a sculpture. Then I start sculpting the torso from the shoulders to the knees around the wire. As soon as I have it the way I want, I bake that part. I have to know what position I want my piece in ahead of time because once I bake that section, I can't change it. 
Then I sculpt the legs from the knee down, feet and arms to the elbow, these are then added to the baked torso. 

 I usually sculpt the head and face next. After that is baked, I attached the head to the wire frame. The last part to be sculpted is the neck, forearms and hands.
Here's a fun collage I put together to show my hand sculpting process.
 My Myxies have 4 fingers on each hand. :)
Now my piece is completely sculpted, time to paint the details to my Holly Myxie. 
 And paint her shoes and add her under garments

Lets give this little one some clothes.
 I hand sew each tiny garment. Hand crafting her sweet little gloves and stockings, making a perfect addition to her outfit. Ribbon trim and jingle bells add a nice touch to her skirt. 
After making her a nice top to match her bottom, I give this bald little darling some hair. 
I had initially planned to make this Myxie a blond but she decided she wanted to be a redhead. I can't argue with a Myxie that knows what she wants :)  
Now she is ready for her holly wings, I specially handcraft them for her. ALL DONE! The 4th annual Christmas Myxie ornament is complete and looking festive.


 This beautiful piece sold right away, these pieces never go very long before finding a nice new home, but don't worry, I make one each year. Just follow my Facebook page and Instagram to get updates and progress photos as I make new pieces.
Check out my Etsy store for my available sculptures.

Thanks for reading! And Happy Holidays!
~Caralyn