Come enjoy my world of Fantasy and Steampunk creations.

Mystic Reflections' Creations

Mystic Reflections' Creations

Caralyn's Events and Appearances

  • Aug. 30th - Sep. 3rd - DragonCon: Atlanta GA
  • Feb. 23rd-24th 2018 - ConNooga, Chattanooga TN
  • Nov. 17th-19th 2017 - Atlanta Steampunk Exposition: Atlanta GA
  • Nov. 11th - 12th 2017 - Christmas at Lithia Springs High school, Lithia Springs GA
  • Oct. 7th 2017 - RevFest: Rev Coffee Smyrna GA

My Blogs

Let's see what I have been up to. :)

Monday, October 26, 2015

First Time Wood Burning Experience

My husband and I just celebrated our 5th wedding anniversary this past weekend. We like to stick to the "traditional" wedding anniversary gifts and this year was wood. So off to Michael's Art Stores to pick up a little wooden box, they aren't expensive and they come in several different styles. The one I got was specifically chosen to hold my husband's Bicycle playing cards collection. Originally I was planning to just draw all over the box with a Sharpie but as I walked past the wood burning tools, I was intrigued to give it a try. They didn't have too many tools to choose from so I purchased the least expensive one, I'm sure there are much better quality burning tools but as a first time user, I wanted to make sure I would enjoy it before spending alot. So now that I had my tool and my canvas, it was time to go home and see if I was going to create art or burn the house down :D
After carefully reading the user directions and making sure I was following the safety tips, such as wearing gloves, I was ready to test out my new toy. I started with a small box I purchased just for the testing of my burning tool. 
Holding the tool takes a bit to get used to, you hold it much like you would a pencil, however you are gripping it higher on it's base so it feels slightly awkward, at least it did to me. Touching the tip to the small particle board box and the wood melted away easily leaving a nice black dot. Dragging the tool along I was able to draw, not as smoothly as you would a pencil but without too much difficulty. Before I knew it, my little testing box was covered in my scorched doodles. Now to move on to the gift box.
I was not happy with the little latch that came with the box so I first replaced that with another I was able to purchase in the wood section.
Then I sketched out the picture I would be burning; there is no eraser for the burning tool so I wanted to make sure I knew where my lines would be. 
Burning this box was slightly more difficult than the smaller box, I am not sure, but I think it was due to more knots in the board. But I was still able to fill my little particle board canvas with lots of art work with a small amount of effort. 
Make sure to always wear gloves when working with your wood burning tool, I was thankful I had gloves on when about half way through my work I smelt leather burning and realize I had rested my ring finger on the hot metal of the tool, had I not been wearing my protection that would have been a painful lesson that no one wants to learn.
After my box was covered in my burned designs I stained it. I am sure that the particle board was mostly to blame but the stain washed some of the burned lines off and I had to reburn them. If I had used oak wood or some other type of wood it may not have erased my lines but it was not that difficult to touch up my piece.


My gift was done and my husband loved it and promptly stored his card collection inside.
I loved wood burning and am definitely going to use my new tool again soon :)

Hope you all enjoyed reading about my first wood burning experience that since I didn't set my home on fire I plan to be doing again :D
Thanks!
~Caralyn 
 

Monday, October 5, 2015

Illustrating a Children's Book

  Twenty-four pages, front and back cover, three sketched rough drafts, over a Thousand hours, lots of hair pulled out and several "do-overs", these are just some of the ingredients that go into illustrating a Children's Book...and I thought illustrating my husband's book covers was a challenge, Whew.
How did this all start, you may ask? Well you have to met the authors first, in my case this encounter took place at Sci-Fi Summer Con 2014, where I met Jay and Katie Barber, a fun husband and wife author duo.
They have written several fantasy novels together despite having two kids and a few cats at home.  Their six year old daughter, Maya, wanted to hop on the author band wagon. She had been creating adventures for a unicorn character named Mend. Trying to encourage her daughter's passion, Katie helped Maya compile the stories together. All they needed now was an illustrator and I was delighted to take on the task. But I had never done a children's book before, needless to say, I had alot to learn.
Designing the characters was the most fun, getting to be creative with Maya's ideas and imagination.
After receiving the sketch approvals from the authors, I began the coloring process. I scanned each of the pages into Photoshop, where I do most of my coloring. Here's a link to show a bit of my Coloring process. 
I have just recently started using "layers" in Photoshop, this was a life saver. Editing text and changing colors or character positions happens plenty while working on a picture book, and making edits after the coloring has already started can be difficult, but layering my images made it much easier. Coloring always takes the most time, but all the detail that is put into each pixelated brush stroke is worth it, once you see the finished piece.
FINALLY I was done and able to get the coloring approved...only a few edits to be made after that :)
Adding the text comes next. Katie and Maya typed up the story so I was able to copy and paste most of the text, with some adjusting of the background and the margins, the book was coming together. Final edits and image tweaks have been made all this week and the proofs for our book have been ordered from the printers.
It has been a long, challenging process, where I have learned so much. I don't want to toot my own horn but I may have patted myself on the back for a job well done. :) And I'm super excited to see what started with the imagination of one little girl, end up on children's book selves all over. :)
"The Adventures of mend" should be available October 15th. You can pre-order it here. :D

Thanks for reading!
~Caralyn

Thursday, August 27, 2015

ONLY ONE WEEK LEFT!!!

Hello Art Fans!
The Dragon Can Art Show is fast approaching (ONLY ONE WEEK TO GO EEP!) and I haven't completely gone bananas yet....I think that is a pretty good accomplishment...I deserve some type of glittery star sticker :)
So I'm super excited for this year, especially due to how well last year's Art Show went. That was our best year ever so I'm hoping to break the record with 2015's Art Show...fingers crossed.

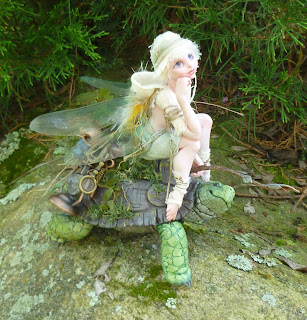
I have a whole bunch of brand new pieces for the show. My Gallery will have two new fairy sculptures, my Traveling Turtle and his fairy friend and a racing snail with his rider :)


 Also I will have several new prints available at my booth this year, includes Steampunk set, Sleeping Beauty and Maleficent, and some small StarWars and Firefly Doodles...don't you just wanna Squeeee :)


And I can't forget my little guys! I have been sculpting my little fingers off to make a tiny army of Steampunk animal pals and I think I've done pretty well. Here's the Dragon Can Art Show Class of 2015 (Steampunk Honors Class) :D

Well, I need to go finish getting ready, the show will be upon us in a blink of an eye and I still have Prints to mat so I will leave you but I hope to see you all there, come by my booth and say hi to me and my little animal friends :)

Thanks for reading, Tootles!
~Caralyn

Monday, July 27, 2015

Traveling Turtle and his Fairy Passenger

Hello Art Fans!
Some of you may have seen the progress photos I posted on my Facebook page of these two little friends, but I have just recently added the finishing touches to this piece so I thought it would be nice to write a blog about my artistic journey from start to finish :)
It started with an idea; I had sculpted this small polymer clay traveling turtle last year.
I enjoyed him so much that I wanted to use the idea for a larger piece for a gallery display. So I got to work on sculpting another turtle. I wanted him to be as realistic as possible, that made the task super time consuming but also a fun experience with new techniques.
I started with his shell, filling the interior with a ball of tin foil to make his body lighter. Then I added different lines and scratches to the clay to make his shell look weathered.
I rolled out the polymer clay as thin as I could and then cut small squares or circles to make the textures on his skin.


Put all the pieces together and painted the last few details to the little guy...now that looks like a turtle. :)


 I sculpted a few things for him to carry on his back, some rolled up blankets, a few foresty treats like acorns, gourds and mushrooms, then I added other trinkets and moss to complete the look.
Now this sculpture would not be complete without a small traveling companion to keep this terrapin from being lonely. So I started working on a fairy rider for our little friend.
Gave the little pixie some hair, clothes and wings and she was ready to head out wherever fate would...slowly take them :)
These two will be displayed in the gallery of the up coming Dragon Can Art Show that I will be attending in September, so make sure to stop by and see the little duo.


Thank you for reading, have a great day!
~Caralyn

Wednesday, July 22, 2015

Speed Colorer!

Hey People! Sorry it's been so long since I last blogged....funny how my to-do list seemed to grow this year. Anyhoo, I have been diligently working on a Children's Book I was commissioned to illustrate. It's a cute little tale of a Unicorn and a fairy that learn about helping others. This adorable story was written by a mother-daughter collaboration, Katie and Maya Barber. Katie and her husband have written several books together, check out their Facebook page.
So since I have been putting alot of time into the pages for the book, I thought I would post a video for you all to show you a bit of my Photoshop coloring technique. The video is me coloring Mend the unicorn and it is sped up...I don't really color that fast or I would've been finished by now LOL :)
Enjoy!
Speed Coloring Children's Book Video
Music in the video by Kevin MacLeod

I am getting ready for the Dragon Con Art Show that is coming up in the beginning of September so keep checking my blog and Facebook page for the pieces that will be available at the show :)

Thank you all so much for reading.
~Caralyn
Wednesday, May 13, 2015

Never Any Doubt.....okay maybe a little...

Heard back from the Dragon Con Art Show Jury, I got in to the Art show....7 years of Dragon Con and it is still nerve-racking to go through jury. But now to get to work on some brand new Gallery pieces, I'm getting started a bit later than normal but this year has been crazy busy.
Anyhoo, got some fun stuff planned, new Framed sculptures, more animal pals, Steampunk animals pals and Steampunk dragons , some of my Steampunk Pocket Watches and a few other little critters including my Cute'Thuluhs, this will be their 1st Dragon Con. :)

So much to do before September!

Can't wait for Dragon Con to see my little guys? You're in Luck, I will be at TimeGate Con May 22nd - 24th, so make sure to stop by and see us :)

Thanks for reading!
~Caralyn

Tuesday, April 14, 2015

Little Caterpillars will one day be Beautiful Catterflies

Catterflies, little creatures that spend their days jumping from flower to flower, drinking the sweet morning dew and sunbathing on top of fluffy beds of pollen.
Catterflies come in an array of bright colors and enjoy lazily lounging in the warm summer breeze.

I hand sculpted each of this little guys out of polymer clay and use translucent polymer for their little wings.


Thank you so much for reading about my little creations. 
Keep checking my blogs and Facebook page for my newest pieces. 

P.S. I will be at Rev Fest this weekend and will have my prints with me, my husband will have some of his novels and will be signing them for you. Also my sister will be with us and have some of her wonderful handmade pieces and some crafting supplies available. So be sure you come on by to see us. :)

~Caralyn 


Thursday, March 26, 2015

Dusk Bunnies, Get it? It's like Dust Bunnies only you won't find them under your couch :D

These sweet little darlings are called Dusk Bunnies. Just as the Sun is setting and the stars are waking up, the Dusk Bunnies scamper out to play and nibble on the last few fading rays of light. Once the Sun has gone below the horizon, the little Dusk bunnies scurry back to their nests to wait until the next night approaches.

This little tale came to me while I was supposed to be sleeping But who can sleep when such adorableness needs a back story, Right? :D


I LOVED creating these cutie pies so these are just the 1st of more :)
I will be posting these cuties to my Etsy Store soon.

Thanks so much for reading!
~Caralyn

Friday, February 20, 2015

That's a Whole Lotta Cuteness

Salutations Everyone!
Just wanted to pop in and tell you all a little about what I have been up to; I know it has been a while since I have blogged but I assure you it was due to being quite busy and not that I forgot about you lovely people...How could I? :)
I usually like to start the year off with a bit of smaller sculptures such as my little Myxie pals. I have been diligently working on a few of my Steampunk Animal pals for the past month and have created quite a few little friends. I am hoping to have a small army by the big Dragon Con Art Show convention in September. Here a few of them.


I post each of my creations as I finish them to my FaceBook page.

Before I go, just want to let you all know that my little creations and I will be in Chattanooga TN for ConNooga Sifi/Fantasy Convention. February 27th - March 1st. Stop by and see us :)

Thanks for reading!
~Caralyn